4. Development
4.1. Overview
In this page, we will introduce following sections:
Getting Startedpart will explain requirements to develop the agent.
2. Agent Architecture and Implementation part will explain most used terms in agent and
how they are connected in the architecture.
Making a New Releasepart will explain how to create a new release.The branching strategypart will explain how you should handle your branches.
4.2. Getting Started
The agent must not block in any way. That is, it must not happen that the agent is stuck endlessly waiting on any operation, regardless of reasons. Typical common issues here are a slow RPC server and a slow/unstable network.
It must be possible to shut down the agent cleanly and reasonably quickly (at most few seconds).
Restarting the agent must not lose any information about previously executed actions e.g. filled requests, claims, challenges etc.
The agent should avoid serializing anything to non-volatile storage.
4.3. Agent Architecture and Implementation
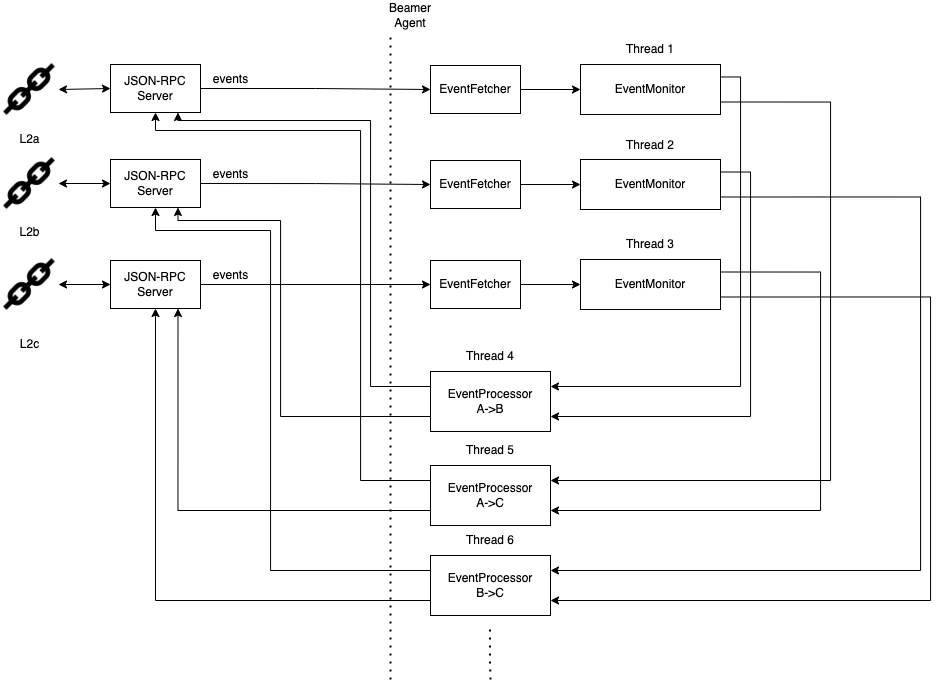
Beamer agent architecture
In order to satisfy above requirements, we opted for a simple thread-based approach where we moved
all software components that could potentially block into their own threads. In particular, these
are EventMonitor and EventProcessor.
For every transfer direction, we have an EventProcessor running on its own thread.
4.3.1. EventMonitor
EventMonitor listens for blockchain events emitted by given contracts, decodes the events
into an internal event representation (event types in beamer.events) and forwards decoded events
to the EventProcessor. The event monitor does not query the JSON-RPC server for events directly.
Rather, it does that via an instance of EventFetcher. Event fetcher handles communication with the
JSON-RPC server and can block. However, even if the event fetcher for, say, source chain, blocks, since
it is only being invoked by the contract event monitor, which runs inside a thread, it won’t block
the entire agent. Therefore, even if a JSON-RPC server is very slow or the connection is otherwise
unreliable, the agent as a whole will remain responsive.
With the current implementation, we have an event monitor for every L2 chain, and each event monitor
has its own event fetcher, as can be seen in the figure above. Each pair (EventFetcher, EventMonitor)
works independently of the other, allowing for very different speeds between the L2 chains.
4.3.2. EventProcessor
EventProcessor implements the Beamer protocol logic. It receives events from event monitors and
stores them into a list. Events are filtered by source and target chains and are stored in
a single list, in the order they arrived.
Note
Each event object, an instance of an event type from beamer.events, has a
event_chain_id attribute that can be used to identify the chain that event came from.
The thread of EventProcessor will typically sleep until something interesting happens. Delivery of
fresh events by one or both of the contract event monitors is just such a case, which triggers two
actions, in order:
processing events
processing requests
The first part, processing events, consists of going through the list of all events and trying to
create new requests or modify the state of the corresponding requests. That process may not always
succeed for every event. Consider, for example, the case where a RequestFilled event was received
from L2b, but the corresponding RequestCreated event had not been seen yet. In that case, the
RequestFilled event will simply be left as-is and will be retained in the event list. All events
that have been successfully handled will be dropped from the event list.
Successfully handling an event typically means modifying the state of the Request instance
corresponding to the event. To that end, EventProcessor makes use of RequestTracker facilities
to keep track of, and access all requests. The request state is, unsurprisingly, kept on the
Request object itself.
The second part, processing requests, consists of going through all requests and checking whether
there is an action that needs to be performed. For example, if a pending request is encountered, the
event processor may issue a fillRequest transaction. Similarly, if a filled request is encountered
and it was our agent that filled it, the event processor may issue a claimRequest transaction. Here
again the request tracker is used to access the requests.
4.3.3. Request
The Request object holds the information about a submitted request and the associated state.
The state machine is depicted by the following figure.
![digraph request_state_machine {
node [] pending, filled, claimed, l1_resolved, withdrawn, ignored;
pending -> filled [label = fill];
pending -> filled [label = try_to_fill];
pending -> ignored [label = ignore];
filled -> claimed [label = try_to_claim];
claimed -> withdrawn [label = withdraw];
claimed -> l1_resolved [label = l1_resolve];
l1_resolved -> withdrawn [label = withdraw];
l1_resolved -> l1_resolved [label = l1_resolve];
filled -> withdrawn [label = withdraw];
filled -> ignored [label = ignore];
filled -> l1_resolved [label = l1_resolve];
ignored -> withdrawn [label = withdraw];
ignored -> ignored [label = l1_resolve];
withdrawn -> withdrawn [label = l1_resolve];
}](_images/graphviz-1b515830b49e44c7c5692c20238f358cc9080fe3.png)
Request state machine
The state machine uses the python-statemachine Python package to declare states and transitions.
Auto-generated transition methods like fill or withdraw are then used by the event process
to update request state. This approach also ensures that only valid transitions are possible.
Request states mostly correspond to contract events, except for pending and ignored states.
A request is in the initial state pending immediately after it is created. The filled state
transitions to either filled, if the agent sent a fill transaction or a RequestFilled event
is received or the withdrawn state if no agent filled it. If in filled state the
RequestFilled event will update internal attributes of the request. The process goes similarly
for withdrawn state, i.e. it is entered when the corresponding blockchain events are processed.
Claims are held in the ClaimTracker object. They will be handled separately.
The only states which will not produce an output in form of a transaction are ignored,
claimed and withdrawn.
4.3.4. Claim
The Claim object holds information about a claim in the beamer protocol.
![digraph claim_state_machine {
node [] started, claimer_winning, challenger_winning, invalidated_l1_resolved, ignored, withdrawn;
started -> claimer_winning [label = start_challenge];
withdrawn -> withdrawn [label = start_challenge];
started -> withdrawn [label = withdraw];
claimer_winning -> challenger_winning [label = challenge];
challenger_winning -> claimer_winning [label = challenge];
ignored -> ignored [label = challenge];
withdrawn -> withdrawn [label = l1_invalidate];
claimer_winning -> invalidated_l1_resolved [label = resolution];
challenger_winning -> invalidated_l1_resolved [label = resolution];
claimer_winning -> withdrawn [label = withdraw];
challenger_winning -> withdrawn [label = withdraw];
ignored -> withdrawn [label = withdraw];
claimer_winning -> ignore [label = ignore];
challenger_winning -> ignored [label = ignore];
ignored -> ignored [label = ignore];
withdrawn -> withdrawn [label = ignore];
}](_images/graphviz-48832c1b34592c3b2efb24cc1604917bc844a1c6.png)
Claim state machine
Claims start in the claimer_winning state, and then alternate between that and the
challenger_winning state, as long as the challenge game is ongoing. As soon as the challenge
game is finished and one participant withdraws the stake, the claim will move into the withdrawn
state.
If an agent is not participating in a claim, that claim will transition into the ignored state.
4.3.5. Unsafe Fill Time
In order to lower the risk of filling a request that is too close to expiration, an agent has a notion of unsafe fill time. This is the time window, expressed in seconds, before request expiration that the agent considers unsafe for doing a fill. Once an unfilled request enters the unsafe fill time, the agent will simply ignore the request.
This time can be configured via the --unsafe-fill-time command-line option and the configuration file
option unsafe-fill-time.
![digraph unsafe_fill_time {
pad=0.5
node[shape=point]
"start" [xlabel=T1];
"unsafe_start" [xlabel=T2]
"end" [xlabel=T3]
edge[arrowhead="none"];
{rank = same; start; unsafe_start}
{rank = same; unsafe_start; end}
start -> unsafe_start [label = "safe", minlen=6]
unsafe_start -> end [label = "unsafe", minlen=4]
}](_images/graphviz-24f6d3d1547f0f4740b88bfd81031e5bbb70556e.png)
Unsafe fill time
In the graph, T1 is representing the request creation time, T2 is calculated using unsafe-fill-time
option, and T3 is the request expiration.
If unsafe time increases, T2 moves to left, so the agent will fill fewer requests.
If unsafe time decreases, T2 moves to right, so the agent will get an opportunity to fill more requests.
4.4. Making a new Release
4.4.1. Making a new agent release
Make sure to populate
CHANGELOG.mdand change the version number (see this commit for example).Commit the changes above, create and merge the PR.
Take note of the commit ID on the release branch (either
mainor one of theN.xbranches, depending on where you are releasing from). Tag that commit (e.g.git tag v0.1.8 COMMIT_ID) and push the tag to Github (e.g.git push origin tag v0.1.8).Note
The ID of the last commit on the release branch may be different from the ID of the last commit on the PR branch, even in cases where those commits have identical changes. Make sure to tag the commit on the release branch, not on the PR branch.
Once the tag is pushed, manually trigger a new CI run on the branch containing the tagged commit, to ensure that the built container image is tagged properly.
The previous step will have created an agent Docker image, which you can use for final testing before the release. If you encounter any release-blocking issues, fix them and restart the release process.
Make a release on Github based on the pushed tag. Copy the relevant
CHANGELOG.mdpart to the release notes; see this page for example.
4.4.2. Making a new deployment npm package release
The @beamer-bridge/deployments package is a npm package that contains the deployment ABIs and addresses. It also contains a git-commit-version.txt file that contains the commit hash of the commit that was used to create the package.
There are 2 different release pipelines for this package.
4.4.2.1. Automatic
Whenever a PR changes something inside the deployments folder, a new dev release is created on the CI server and pushed to npm.
4.4.2.2. Manual
Whenever we want or need to pin a new major version of the deployments ABIs and addresses, we need to manually update the package.json version and create a PR. Once the PR is merged into main, a new release with the specified version number is created on CI server and pushed to npm.
On manual release we need to make sure that the package version we specify is higher than the current version on npm.Failure to do this will result in a failed npm release.
4.5. The branching strategy
Here are some guidelines on our usage of branches.
Create a new N.x branch whenever a new mainnet deployment is made. Such a branch is called a deployment branch. This clearly separates different mainnet deployments and makes it easier to test agent and the frontend for a particular deployment. The new branch number N is always 1 greater than the number of the most recently created deployment branch.
The most recent deployment branch follows the main branch until someone decides to diverge from main. This can be done as easily as:
git push origin main:N.x
Note that this must result in a fast-forward of the N.x branch.
After a deployment branch diverges from main, further changes to the deployment branch
require PRs to be made.
This is to ensure proper consideration and code review of the changes. In most cases it is
expected to have commits from main cherry-picked to N.x.
Try to diverge from main as late as possible.
Due to the above, once a deployment branch diverges from main, it can become annoying
to file PRs for even the smallest of changes. To lessen the pain, we should try to avoid
needlessly diverging from main.
Strive to do the changes on main first, then port to the deployment branch.
The main branch should be the first landing spot for changes, however, in cases
where this is not possible or makes things harder, feel free to do it the other way
around.
Agent releases are always made from a deployment branch. This is due to the fact that a particular agent releases assumes a particular deployment. Also, agent releases are numbered in line with the deployment branch name.
Any contract changes committed to the main branch cause the current deployment branch
to diverge from main.
At this point, the deployment branch stops following main and PRs are required.
4.6. Testing a new deployment
After deploying Beamer to a chain, it is critical to check the new deployment to make sure that not only the contracts work correctly, but also that the agent software works with the new deployment. To that end, there are two kinds of checks that need to be performed: L1 invalidations and challenges.
4.6.1. L1 invalidations
Checking whether L1 invalidations work correctly is done as follows:.
Let
X1,X2,…Xnbe IDs of all chains that are supported by Beamer. Also assume that one of those,C, is the ID of the chain you just deployed to.First, arrange for invalidations to be sent from
Cto all chains:beamer check initiate-l1-invalidations --output invalidations.json C X1 X2 X3 ... Xn
Note that this command will issue multiple invalidations, by default one for each chain pair
(C, Xi).Then, arrange for invalidations to be sent from each chain
XitoC:for x in X1 X2 ... Xn; do beamer check initiate-l1-invalidations --output invalidations.json $x C done
This is to make sure that the other direction also works. Note that we use the same file,
invalidations.jsonto collect all invalidations, regardless of the directions.Verify invalidations:
beamer check verify-l1-invalidations invalidations.json
This will verify all invalidations from
invalidations.json. Due to the fact that different chains may have different finalization periods, it is possible that some invalidations succeed while others fail. This is expected and you should be able to re-run the command later to check again. Once the finalization period is over for every invalidation, the command should successfully verify all of them. Typically, after a week all invalidations should be finalized.
4.6.2. Challenges
Checking whether challenges are working correctly follows the same pattern as L1 invalidation checks, however, it is a bit more involved because an agent needs to be configured and running on all involved chains.
The procedure is as follows:
Let
X1,X2,…Xnbe IDs of all chains that are supported by Beamer. Also assume that one of those,C, is the ID of the chain you just deployed to.First, make sure to have a deployed test token on each chain.
Note
The test token must be an ERC20 token.
In general, it’s easiest to just deploy MintableToken when deploying Beamer
(see --deploy-mintable-token option of the beamer deploy command).
From this point on, we will assume that MintableToken (TST) will be used.
Make sure the test token is configured in the
RequestManagercontract on each chain. This is done by callingRequestManager.updateToken()with the test token’s address, transfer limit that is greater than zero andethInToken = 0.Configure and start a single agent instance that monitors all
X1…Xnchains. The test token address needs to be configured properly on each chain in the agent configuration file and the agent needs to be whitelisted on all chains.
Note
Make sure that the agent version you are going to use ships with a relayer that is aware of all the chains, including the one you just deployed to.
Fund the agent on each chain. This means that, on each chain, the agent needs to have:
at least 1 wei of the test token
at least
requestManager.claimStake()wei of ETH, for making a claimsome smaller amount of ETH for transaction gas costs
Fund the challenger on each chain. The next step will involve challenging the agent with enough stake (0.1 ETH) to force L1 resolution. Therefore, on each chain, the challenger needs to have:
at least 0.1 ETH for the challenge stake
some smaller amount of ETH for transaction gas costs
Initiate a challenge game on each chain, with
Cas the fill chain (make sure to use the funded challenger account when specifying the--keystore-fileoption):beamer check initiate-challenges --token TST --output challenges.json C X1 X2 X3 ... Xn
For each chain pair
(C, Xi), this command will make a transfer request ofTST1 wei fromXitoC. It will wait for the agent to fill onCand then claim the request onXi. Once the agent makes its claim onXi, the command will issue a challenge.Then, initiate a challenge game on each chain, with
Cnow being the source chain:for x in X1 X2 ... Xn; do beamer check initiate-challenges --token TST --output challenges.json $x C done
This is to make sure that the other direction also works. Note that we use the same file,
challenges.jsonto collect all challenges, regardless of the directions.Verify challenges:
beamer check verify-challenges challenges.json
This will verify all challenges from
challenges.json. Due to the fact that different chains may have different finalization periods, it is possible that some challenges succeed while others fail. This is expected and you should be able to re-run the command later to check again. Once the finalization period is over for every challenge, the command should successfully verify all of them. Typically, after a week all challenge games’ results should be finalized.